MicroCity
| < 2.2 Searching for Countries | Table of Contents | 3.2 Editinging Scripts > |
3.1 UI Overview
MicroCity Web provides a compact and versatile user interface.
Interface Partitions and Functions
The user interface of MicroCity Web is divided into four parts: Button Panel, Script Editor, Scene Canvas and Message Bar as shown in the figure below:
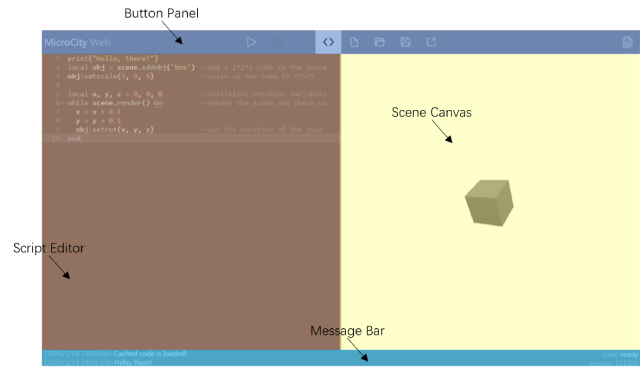
Here we briefly introduce the button panel, the script editor, scene canvas and message bar will be discussed in details in later chapters: 3.2 Editing Scripts, 3.3 Running Scripts and 3.4 Navigating Scenes.
Button Panel
The button panel contains a logo link (click to open a new window), nine clickable buttons, most of which can also be right-clicked. Dialogs, Documentations and Script Editor can be closed by ESC button. Below is the function table of each button.
| Button | Name | Shortcut | Left-click | Right-click |
|---|---|---|---|---|
 |
Run/Debug | F5 | Run the script | Debug the script |
 |
Pause | F6 | Pause the script running | |
 |
Stop/Kill | F7 | Stop the script running | Kill the process |
 |
Show Code | F8 | Show/Hide the Script Editor | Show/Hide the Script Editor in full mode |
 |
New/Clear | Ctrl + B | Create a new script | Clear the script and virtual disk |
 |
Open/Upload | Ctrl + O | Open a script/project file | Upload files to the virtual disk |
 |
Save/Download | Ctrl + S | Save a script/project file | Download files from the virtual disk |
 |
Publish/Embed | Publish the project to WEB | Embed the project in URL | |
 |
Documentation | F1 | Show documentations |
File Management
MicroCity Web can package the script and virtual disk files into a single .wm file for easy carrying. You can also use Publish/Embed to publish it as a short link or embed it in URL. The following table shows the file types supported by MicroCity Web.
|Type|Format|Usage|Remark|
|—|—|—|—|
|.wm |MicroCity Web File|Open/Save/Publish|Package for script and virtual disk files|
|.lua |Lua File|Open/Save|Only script in the editor|
|.json |JavaScript Object Notation|scene.addobj/scene.tojson|Threejs JSON file|
|.geojson|Geographic Data File|scene.addobj|Load to the XY plane of the scene|
|.gltf/.glb|Graphics Library Transmission Format|scene.addobj|Better to use GLB for save space|
|.jpg etc.|Bitmap Image|scene.setmat|Use as texture for scene object|
In addition, any type of file can be uploaded to the virtual disk by right-clicking Open, dragging directly, or using the upload function so that the script can directly access it (resoures in sample scripts are in the ‘/res’ directory). Files in the virtual disk can also be downloaded to the local by right-clicking Save or the download function. You can also save any file as a URL link by right-clicking Publish.
| < 2.2 Searching for Countries | Table of Contents | 3.2 Editinging Scripts > |